ET-86v2g-a23-v1.5 100% Working Firmware

By // 11 comments:

ET-86v2g-a23-v1.5 100% test ok file working

[GUIDE][ROOT][TWEAKS] Generic Allwinner A23 Tablet

et-86v2g-a23-v1.5 100% test ok file working  
I recently bought another tablet off of eBay. This time, it's a very generic one. It does have branding and such, and calls itself "Hypertab", but it is no different from the other generic tablets with the same specs.
System Specifications
  • Android 4.2.2 Jellybean
  • Allwinner A23 - Cortex A7 Dualcore CPU 1.5GHz
  • Mali-400 GPU
  • 512MB DDR3 RAM
  • 2GB Inernal Flash Memory (Actual usable amount is less) + Expandable with MicroSD up to 32GB
Disclaimer (Please Read Before Continuing.)
I am in no way, shape or form, responsible for the outcome, positive or negative, of you following the provided instructions on this thread.
It worked for me, but that does not mean it will 100% work for you. You are responsible for any side effects and damage caused to your device, your property, anyone nearby, or yourself, which includes, but not limited to: software and/or hardware destruction of the device, robbery, riots, injury, death, acts of god, epidemics/pandemics, natural disasters, government shutdowns, mutations, getting a certain limb of your body stuck in a ceiling fan, etc. Rooting WILL void your warranty (if there is any).
Root Guide
Preparing to Root
Rooting the Device
  • Using a USB cable, connect your tablet to your computer.
  • Wait until Drivers are installed and Kingo Root Detects your tablet.
  • Hit "Root" or "Root Again" (as it said for my tablet).
  • Wait until Kingo Root finishes its magic.
  • Once Kingo finishes, and says that root was successful, reboot your device, and you can close Kingo Root.
  • Go to the play store (or Google the APK if you don't have Play Store) and download SuperSU or something similar.
Congratulations! Your Generic Allwinner A23 Tablet is now (or should be) rooted! To check that you have root permissions, download Root Checker from Google Play store or any other store. Tweaks
Now that you have rooted the tablet, let's mess around with the system so it works as you want it to work!
Overclocking/Underclocking
Just use No-frills CPU Control (https://play.google.com/store/apps/d...rillsCPU&hl=en)
The tablet by default spins at 1.2 Ghz. It can be put up to it's maximum, 1.5. On mine, I also have the option of going to 2.0 GHz, but I've never tried it yet.
build.prop
Now this is an interesting one. I found some lines in the file that are interesting, and it seems editing some of them are quite helpful, especially with the battery life and performance. I've listed them below. In order to edit the file, I used JRummy's Build Prop Editor (https://play.google.com/store/apps/d...p.editor&hl=en).
chiphd.bright.max - The highest brightness for the display.
chiphd.bright.min - The lowest brightness for the display.
ro.hwa.force - Force GPU rendering. True/False
video.accelerate.hw - GPU rendering for videos. 0/1
The rest of the lines are quite common among all the devices I've seen so far, and frankly, googling "build prop battery saving tweaks" will do fine for them.
Have more tweaks? Just add them on to the thread, and I'll post them here with your name
FAQ
Is there a custom recovery for this tablet? Nope.
Is there a custom rom for this tablet? Nope.
Why? Nobody seems to know why but Allwinner is a bit hard-a'd about releasing the code so people can develop from it. They are also violating GPL in many ways so most threads about Custom Roms for these kind of tablets gets closed up on XDA.

working file 100%% full options working
Download Firmware

Miracle Box 2.16 Crack Free Download

By // 5 comments:

Miracle Box 2.16 Crack Free Download

Miracle Box 2.16 MTK 6595 Added & SCI 7730 Support format
Miracle Box 2.16 Crack
What New in Update:
✔ 1.MTK Add MT6595 EMMC read,write support
✔ 2.MTK Add MT6595 EMMC format,clear Anti_theft support
✔ 3.MTK Add MT6595 EMMC Root,Root->clear code support
✔ 4.MTK Add MT6595 IMEI support
✔ 5.SPD Improve SC7730/7731 Boot
✔ 6.SPD Add SC7730/7731 Format support
✔ 7.SPD Improve Factory File type to write
✔ 8.MTK Some software bug fix

Download Crack Setup File
Download Loader Crack Tool
Password:@miraclebox216

How To Flash ATM(XXX) Chip With ACTIONS Pad Product Tool Guide

By // 1 comment:
How To Flash & Update ATM Chip With ACTIONS Pad Product Tool

  ACTIONS Pad Product Tool_V1.06.02.rar

How To Flash ATM Chip With ACTIONS Pad Product Tool

  • Open ACTIONS Pad Product Tool
  • Connect Your tablet To Boot Mode () Boot Mode - Press Volume and Connect tablet to PC
  • Choice Fw and Click Replace
  • Click to Download
  • Wait ... For Successful
  • That's It
Tested Report - ATM Chip}-TW_J0711_v40 Successfully Flashing Done With Original Fw
 ATM Chip}-TW_J0711_v40 Successfully Flashing Done With Original Fw

ACTIONS Pad Product Tool_V1.06.02.rar
F1120-WK-TWD-0308+0329像头带灯HDMI20140326.rar
Boot Mode - Press Volume and Connect tablet to PC
Password : fphone

How To Repair imei A20,a13,a10,Mtk cpus supported Tablet Device Guide

By // No comments:
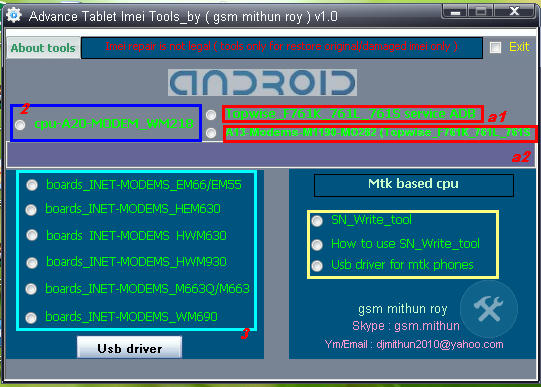
Advance Tablet imei repair tools V1.0
supported allwinner A20 cpu
supported allwinner a10 cpu
supported allwinner a13 cpu
supported Mtk 6572,65xx cpu
suppotred allwinner 2g modem imei writing
supported allwinner 3g modem imei writing
Different imei writing tools for different modem version


note : All tools need usb debugging on

For any tablet imei repair

How to use :
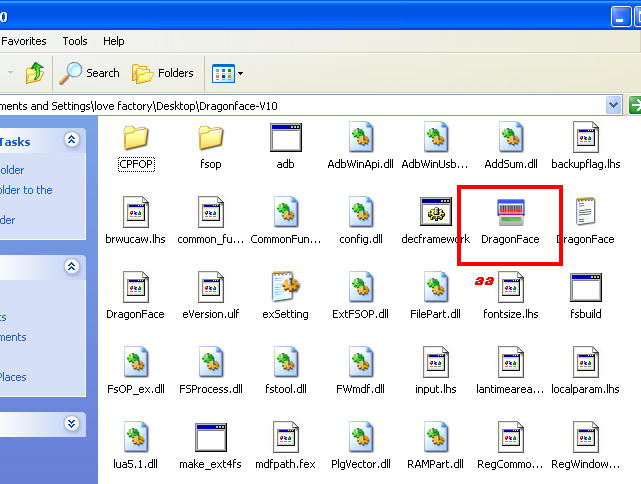
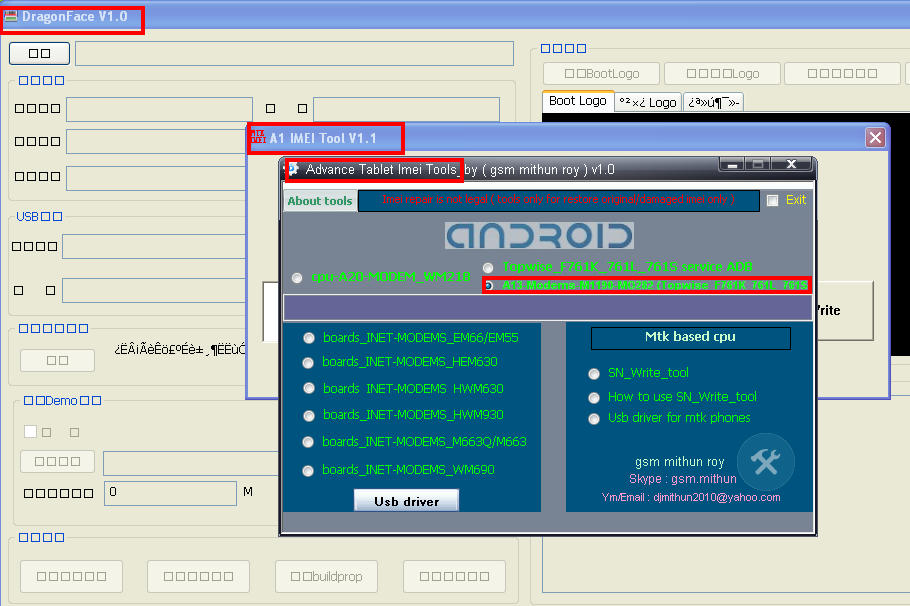
A1 & a2 : Click a1 topwise_F761k_761l_761s service Adb copy or extract Dragonface_v10 folder to desktop > open folder and deagonface.exe,now close advance tablet imei tools and open tool aagin now click a2 a13 modems1190-m0228 (topwise_F761k_761l_761s) then connect tablet and repair


2 : just click and fill the box imei digit press write

3 : click to any tools
according matches su al modem device enter 15 digit imei in cmd tool press enter then restart device and check
DOWNLOaD

HowTo Update Allwinner A23 CPU devices Using [PhoenixUsbPro] Flashing Guide

By // No comments:
 HowTo Update Allwinner A23 CPU devices Using [PhoenixUsbPro] Flashing Guide
Things you may Need (The ones marked with a * are not optional):
- Stock firmware ROM*
- PhoenixSuit Key*
- PhoenixUSBPro* (Even if people keep calling it PhoenixSuit, thats its name when you install it)
- Semi-bricked Tablet* (Stuck on Logo, Cant enter recovery, etc.)
- Windows XP x86 or Windows 7 x86 / x62 *
- Patience**

This is a READ FIRST and READ-WHILE-ON-IT tutorial, Make sure to READ IT FIRST and then you can read it while youre doing it. If you attempt to do it while youre reading it without reading it first you'll be propense to make tedious mistakes.

Let's get on it.

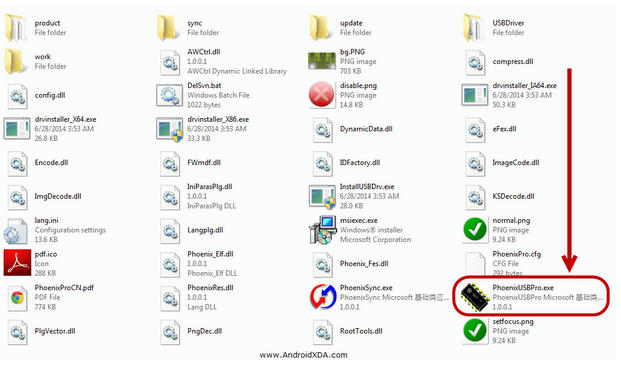
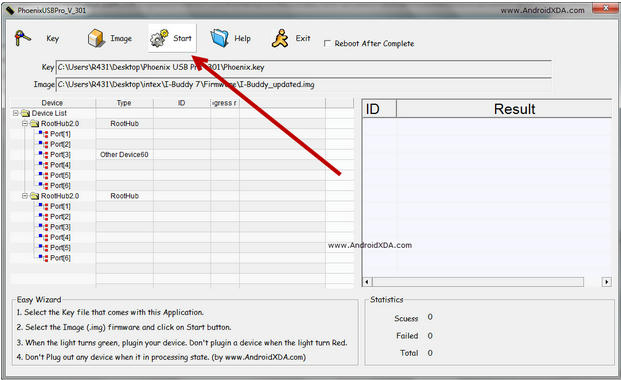
Install PhoenixUSBPro and once its installed, open it.
Phoenix is just like livesuit but they have a bigger interface, youll see the task buttons on top:
Key file | Image | Debug View | Start | Help | Update | Exit | []reboot
below it shows your USB Hub status (internal and external)
and on the right side theres a box to hold your failed or succededly flashed devices.

DONT connect your tablet yet.

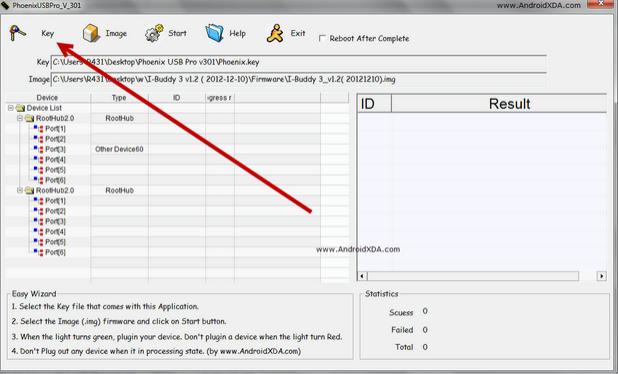
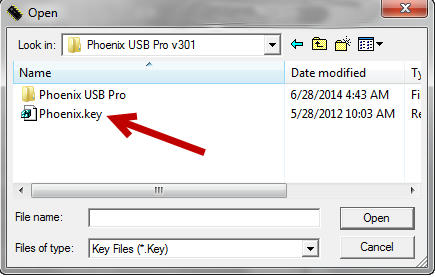
Press the key file button and navigate to where your Key file is and double click on it to select it.
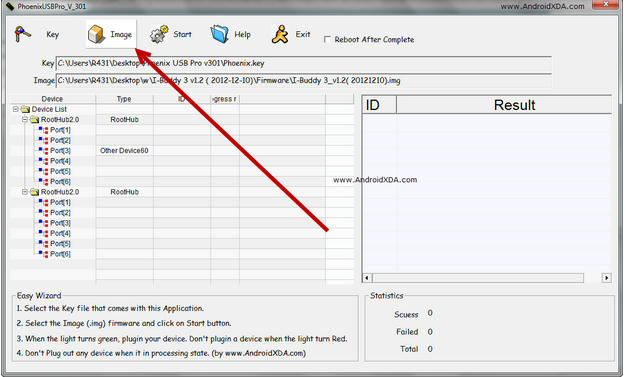
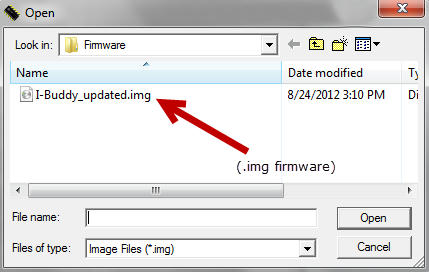
Press the Image button and navigate to where your *.IMG Stock firmware rom file is and double click on it to select it.

Youll see a (X) red Icon on the right. Dont mind it yet.

DONT connect your tablet yet.

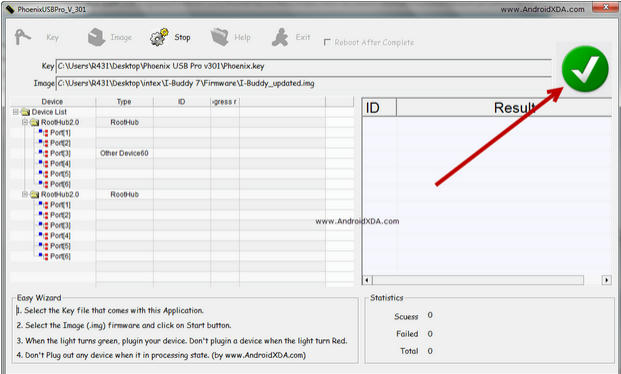
Press Start. The red Icon should have turned to GREEN. If it didnt, something went wrong, they key file or the *.IMG rom file are damaged, corrupted, downloaded wrong or they are invalid. Search for a working ROM or start again the tutorial.
(Most of the times it should do just fine).

after the Icon has turned green, we are ready to connect our device.
First connect your USB Cable to your computer and leave your tablet disconnected
Make sure your tablet is completely turned off.
Before connecting your tablet, press the Volume+ button (or search your device's FEL Button on google / Linux-sunxi) for the Q88Pro, and Q8H is Volume+, probably for others the same.
Ok, Hold the Volume+ button pressed down and connect your USB Cable to your Tablet (While holding the Volume+ button down).
Right after connecting your USB Cable into your tablet (without releasing the Volume+ Button) Start pressing your POWER button repeatedly, One time every second.
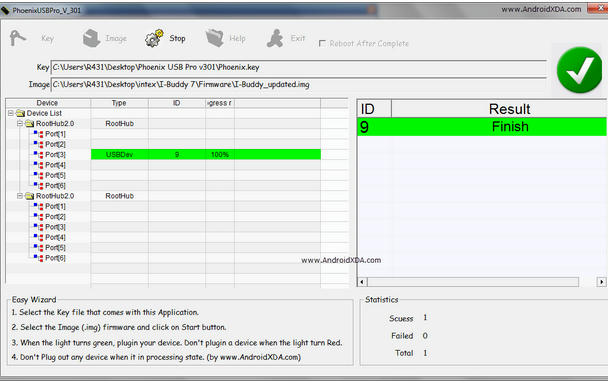
At the sixth time (for some devices you need to press it 10 times or more) it will pop in your USB Hub interface box a device. Wait a few and it will appear your connected tablet.
It will say: Your device's queued ID and the process percent.
Mostly starts fast til 7% and then it continues to 53% then it does the job.
It'll take about 2"5 mins so be patient I know you want your tablet restored.

After its done it will appear on the right box if it succeeded or failed and the time the flashing took.
now you can press Stop and disconnect your tablet.

In the FEL Mode, even if your tablets screen is deep black, it might be still turned on.
So firstly try to turn it on normally holding your power button for about 3 to 5 seconds, if nothing seems to happen you need to force-shutdown first, for it: hold your power button for about 10 to 15 seconds. After that your tablet should be powered down, proceed to turn your tablet on. VOILA!!, good work guys.!
phoenixusbpro flashing guide for new user
Here im adding something for new user with pic
1st Downlod Letest Flasher From here
NT: Letest Phonixcard also can flash a23 available on following link
Here we go Phoenixusbpro flashing guide :
1. open phoenixusbpro folder and open PhoenixUSBPro.exe
[for win 7 user run as Adminishtrator ]

2.Click no key bottom from top

3. select key file from phoenixusbpro key folder [ only for 1st time farther when you use it will auto detect key file ]

4.now click to image button and select downloded firmware


5.now after select image click to start button

6.after select start you will see a green trick mark at and of left side
this mean all ok you are ready to flash your tablet

8.final stage you have to force tablet in flash mode by key combintions [its same as livesuit flashing stage ]
HOLD on vol + or - key then connect usb to tablet and quickly keep pressing power button few times 10-15-20 you will see flashing process started software will detect your tab usb
and wait for finished massage


All done now disconnect and power on your tablet 

How To Update & imei Repair Huawei P6-U06 tutorial Guide

By // No comments:
This phone was trying to unlock other boxes and left him dead, unlit and without radio.

zZ_Huawei_Advanced_Tool_v2.7.2.0

First of all this command is imprecindible.
* # * # 2846579 # * # * ProjectMenu-> background setting-> usb ports setting-> usb ports Setting-> Manufacturer Mode

Press Read info, see the state of our phone.

Connecting ...
Phone Detected.
Reading Phone Info ...
Initializing ...
-------------------------------------------------- ----------------------------------------
Imei: 004999010640000
Serial: E2N7NB9362736494
-------------------------------------------------- ----------------------------------------
Operation Done.

When the phone is in disrepair trying to repair with the rest of the boxes this is the big problem.

Reapir IMEI
Connecting ...
Phone Detected.
Reading Phone Info ...
Initializing ...
-------------------------------------------------- ----------------------------------------
Imei: 004999010640000
Serial: E2N7NB9362736494
-------------------------------------------------- ----------------------------------------

Repairing IMEI ...
New Imei: 860505024234160
-------------------------------------------------- ----------------------------------------
HWS Info: 3, 0x00, 0x00
Info BBS: 3, 0xA0, 0x40
-------------------------------------------------- ----------------------------------------
Phone Hacking, please wait ...
Sending Loader (s) wait ...
Imei Repair Done.
Please restart phone now.
Operation Done.

Press in the cell * # 06 #, if you have the same IMEI, then perform the following steps.
Note: The phone must be rooted is it gets the modem is attached in this post.

Run the file modemrepair.bat, hopefully that will leave us the window closes.

Hold for 15 seconds precionado the power key, if not turn the phone please turn it on.
Type in that command again:
* # * # 2846579 # * # * ProjectMenu-> background setting-> usb ports setting-> usb ports Setting-> Manufacturer Mode

Volbamos A zZ_Huawei_Advanced_Tool_v2.7.2.0

Read Info We know that is connected to the phone.
Connecting ...
Phone Detected.
Reading Phone Info ...
Initializing ...
-------------------------------------------------- ----------------------------------------
Imei: 004999010640000
Serial: E2N7NB9362736494
-------------------------------------------------- ----------------------------------------
Operation Done.

As we see the IMEI is still the same.

We Unlock.

Connecting ...
Phone Detected.
Reading Phone Info ...
Initializing ...
-------------------------------------------------- ----------------------------------------
Imei: 004999010640000
Serial: E2N7NB9362736494
-------------------------------------------------- ----------------------------------------

Phone Unlocking ...
Failed, Imei is damaged. Firstly, You must repair it.
Unlock Failed.
Operation Done.
Here we realize that the modem was already corrupt and repaired is Raparo.

Then we give IMEI repair and magic is done.
Connecting ...
Phone Detected.
Reading Phone Info ...
Initializing ...
-------------------------------------------------- ----------------------------------------
Imei: 004999010640000
Serial: E2N7NB9362736494
-------------------------------------------------- ----------------------------------------

Repairing IMEI ...
New Imei: 860505024234160
-------------------------------------------------- ----------------------------------------
HWS Info: 3, 0x00, 0x00
Info BBS: 3, 0xA0, 0x40
-------------------------------------------------- ----------------------------------------
Phone Hacking, please wait ...
Sending Loader (s) wait ...
Imei Repair Done.
Please restart phone now.
Operation Done.
Press again the power button for 15 seconds, until it turns off if no lights just turn it on.
Put the command:
* # * # 2846579 # * # * ProjectMenu-> background setting-> usb ports setting-> usb ports Setting-> Manufacturer Mode

Connecting ...
Phone Detected.
Reading Phone Info ...
Initializing ...
-------------------------------------------------- ----------------------------------------
Imei: 860505024234160
Serial: E2N7NB9362736494
-------------------------------------------------- ----------------------------------------
Operation Done.
Job done, the first support in the world that accomplishes what do perfectly.
How to repair IMEI like 004999010640000 or unknown/Damage baseband with Hisilicon with the help of ZZ Key?
You have to follow these manual to repair IMEI like 0044xxxxxxx and unknown/damage baseband of an android mobile:
1. Root your huawei device first
2. Go to where zZKey software is located:
ZZ_Huawei_Advace_tool 'Utilities'P6-U06_Utility_script
3. Go to "Utilities" folder
4. Go to P6-U06_Utility_script folder.
5. Run "hisi_backup_nv.bat" script
6. Wait few seconds.
7. Now, run "hisi_fix_call_data.bat"
8. Wait few seconds .
9. Now, reboot your phone.(keeping press power up button for more than 15 seconds)
10. Now open "Huawei_Advanced_Tool"
11. Choose the Platform as "Huawei Hisilicon Phone"
12. You don't need to choose special port. Software itself connects to this special port.
*#*#2846579#*#*
ProjectMenu->background setting->USBPORTs setting->USbPorts Setting->Manufacturer Mode
13. Click on: "Repair Secure Area" button
14. Click "IMEI repair" button
15. Wait until the operation is completed.
16. Done.
 Download
Modem File Download

How To Update ASUS Fonepad 7 K012 (FE170CG) Guide Solution

By // No comments:
Hey Guys,
Today i'm gonna show you how to solve SD update problem for ASUS K012,
I was suffering from that problem for a while and tried almost EVERYTHING,
The problem is that SD Update always FAIL,
#let's begin,

First of all you have to identify what FW ver you have,
1. Start the TAB in Droidboot by pressing and HOLDING Volume UP and Power button until the menu appears
2. Now you can see what FW Installed on your TAB

3. Now go to ASUS Support Site and Download the same FW as your TAB,


4. After Downloading FW, Extract it and Copy .zip File to SD Card and rename it to k012_sdupdate.zip,
5. Now put back SD Card into TAB and Reboot into DroidBoot Mode,
6. Now Here is the Trick, You have to Plug the Charger in the TAB while Updating from SD So, Plug the Charger now then choose SD Update,
7. Wait until Update process finish then reboot your TAB,

>>DONE<<
#In case that guide didn't help you solve your problem try this one,

1. Extract this files from the FW zip file and copy them to fastboot folder,

1.fastboot.img
boot.img
splashscreen.img
 2. Start your TAB in DroidBoot mode and via Fastboot excute this commands one by one,
fastboot erase cache
fastboot erase system
fastboot erase userdata
fastboot flash fastboot fastboot.img
fastboot flash boot boot.img
fastboot flash splashscreen splashscreen.img
 3. Now Copy the same .zip File that you've extracted 3 .img files from to SD Card and rename it to k012_sdupdate.zip and Copy it again to the same SD Card but this time rename it to ASUS_BUNDLE.zip,
4. Put back SD Card into TAB and Reboot into DroidBoot then Plug Charger and Select SD Update,

>>DONE<<
NOTE: SOLUTION TESTED BY ME MANY TIMES AND I'VE FIXED MORE THAN 10-TABS.